Pass/Fail Limits
The DF3 Series force gauge allows the user to set separate Pass/Fail limits for each result in a test. For e.g. we can set separate limits for T-Peak and Load Averaging and the test status will depend on whether the T-Peak or the Load Average value lie within the corresponding limits. Moreover, the user can also disable Pass/Fail limits if they are not of interest for a particular result.
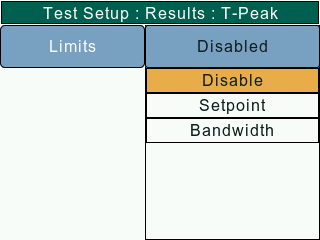
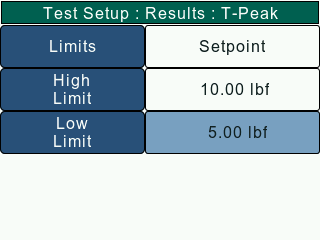
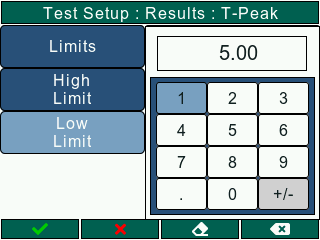
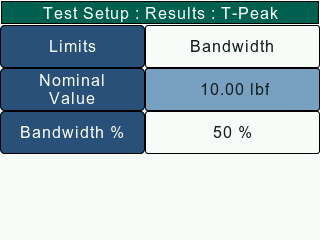
Pass/Fail limits can be configured from the Test Setup: Results screen. This screen allows the user to select a particular result and configure the Pass/Fail limit as per requirement. The Pass/Fail limits can be disabled or set using either the Setpoint or the Bandwidth method.
Setpoint Method

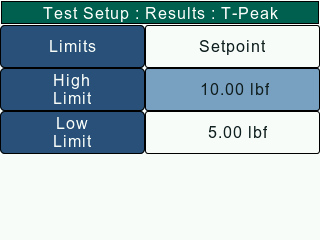
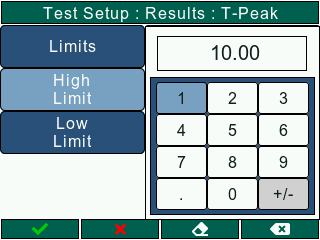
The Setpoint method allows the user to set high and low pass/fail limits. Under this method, the user will set values for the High and Low setpoints using the numeric keypad.
Example: The DF3 Series will display green PASS if the measured result is 11.2 lbf and the upper setpoint was 12.0 lbf and the lower setpoint was 10.0 lbf.
Conversely, if the measured result was 9.8 lbf, the gauge would display red FAIL.
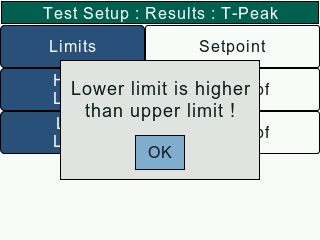
Note - When the limits are set using the Setpoint method, the user must make sure that the High setpoint value is greater than the Low setpoint value. The gauge will throw an error if this condition isn't met.
High Setpoint
The High Setpoint determines the upper Pass/Fail limit. If the final result exceeds this value, the result status is FAIL_HIGH. The user must make sure that the entered value is less than the maximum gauge capacity.
Low Setpoint
The Low Setpoint determines the lower Pass/Fail limit. If the final result drops below this value, the result status is FAIL_LOW. The user must make sure that the entered value is less than the maximum gauge capacity.
## Bandwidth Method comment: <> (Bandwidth Method)
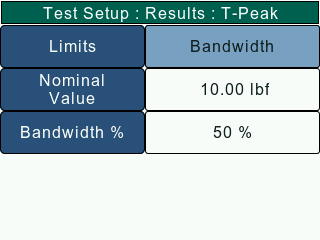
The Bandwidth method allows the user to set pass/fail limits with respect to a Nominal Value. Under this method, the user will set values for the Nominal value and Bandwidth percentage using the numeric keypad. Based on the inputs, the high and low limits are set as follows -
H.L = N.V + (N.V * B.P / 100)
L.L = N.V - (N.V * B.P / 100)
H.L - High Limit
L.L - Low Limit
N.V - Nominal Value
B.P - Bandwidth Percentage
Example: The DF3 Series will display green PASS if the measured result is 9.8 lbf and the Nominal Value was 10.0 lbf and the Bandwidth is 10%.
Conversely, if the measured result was 8.9 lbf, the gauge would display red FAIL.
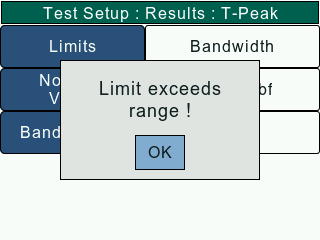
Note - When the limits are set using the Bandwidth method, the user must make sure that the High and Low limits as per the formula mentioned above must not exceed the maximum gauge capacity. The gauge will throw an error if this condition isn't met.
Nominal Value

The Nominal Value determines the midpoint around which the bandwidth is calculated. The user must make sure that the entered value is such that the limits are lower than the maximum gauge capacity.
Bandwidth Percentage

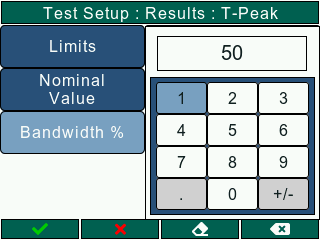
The Bandwidth Percentage determines the percentage of Nominal value that'll be added to and subtracted from the Nominal value in order to set the high and low limits respectively. The user must make sure that the entered value is such that the limits are lower than the maximum gauge capacity.